Guide · QA + AI series · 10/31 · November 13, 2026 · 6 min read
Playwright MCP: an agent that browses your app and proposes tests
Connect Playwright MCP to your agent, run a guided exploration and end with a test plan and one test built on the page's real roles.
For years, generating UI tests with AI meant pasting HTML into a chat and getting guessed selectors back. The model never saw the application running: it didn't know what appears after a click, which button ends up disabled or how long a list takes to load. The resulting tests compiled and failed on the first run.
The Playwright MCP server changes that starting point: it gives the agent a browser it can drive. It navigates, clicks, fills in forms and reads the real state of the page. This guide shows how to use it in order, first to explore and only at the end to write code, and which limits to set, because an agent that reads pages also reads whatever someone wrote on them.
How it fits together
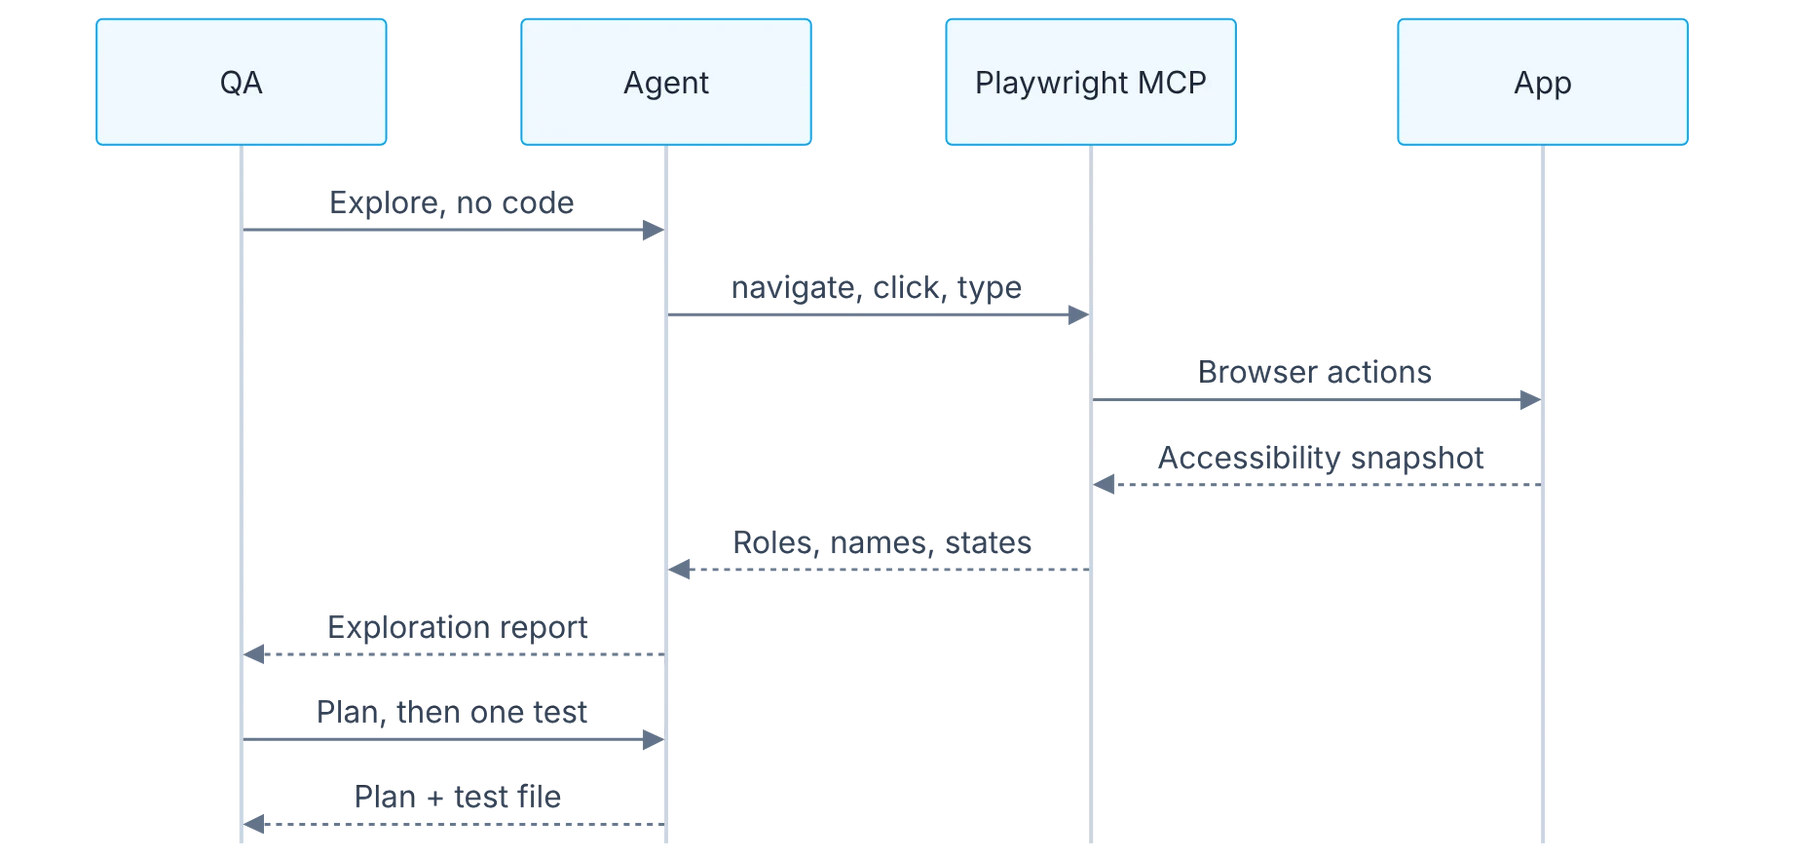
Show the diagram as text
QA    ──▶ agent   explore, no code
agent ──▶ MCP     navigate / click / type
MCP   ──▶ app     browser actions
MCP   ◀── app     accessibility snapshot
agent ◀── MCP     roles, names, states
QA    ◀── agent   exploration report
QA    ──▶ agent   plan, then one test
QA    ◀── agent   specs plan + test file
Requirements
- Node.js 22+ and an MCP-capable agent.
- Practice app:
https://demo.playwright.dev/todomvc. - Test environments and test accounts only.
Setup
# Claude Code
claude mcp add playwright npx @playwright/mcp@latest

# Any MCP client: .mcp.json
# { "mcpServers": { "playwright": { "command": "npx", "args": ["@playwright/mcp@latest"] } } }Open https://demo.playwright.dev/todomvc. Explore adding, completing, filtering and deleting todos.
Do NOT write code yet. Report: elements by role and name, states you observed,
and anything that looks like a defect.Step by step
1. Connect and confirm
Connect the Playwright MCP server to your agent and confirm the browser tools show up.
Add the server to your agent with the command in the guide and, before asking for anything, list the available tools. The browser ones must show up: navigate, click, type, take a snapshot. If they don't, the agent will answer anyway, but from memory, and you'll believe it explored the page when it didn't. That ten-second check prevents the most common confusion. Then ask for something trivial, such as opening a URL and stating the title, to confirm the browser responds.
2. What the agent sees
Understand what the agent sees: an accessibility snapshot with roles and names, not an image. That's why its locators come out better.
It doesn't see a screenshot but an accessibility snapshot: a text tree with each element's role, its accessible name and its state. A button appears as a button with its label, a field as a textbox with its label. That has two consequences. First, the locators it proposes are based on roles and names, which are more stable than CSS classes. Second, a page with poor accessibility is as hard for it as for a screen reader, and that is already a finding.
3. Explore without writing code
Explore first, no code. Use the exploration prompt and read the report of roles, states and possible defects.
Ask it to walk through a flow and report what it finds, with the explicit instruction not to write tests yet. The report should list elements by role, the states it observed, such as empty lists, errors or disabled elements, and whatever seemed odd. Read it the way you'd read the notes of someone using the product for the first time. It's useful for discovering states you hadn't thought of. It isn't useful as a bug list: the agent doesn't know your business rules.
4. A Markdown plan, corrected by you
Ask for a Markdown test plan based on what it observed and fix it yourself: priorities and missing cases.
With exploration done, ask for a test plan in Markdown based only on what was observed. A plan is cheap to correct and a set of tests isn't. Review it with three questions: which cases are missing that only someone who knows the business would know, which are redundant because they repeat the same thing, and what the real priority of each one is. Save the corrected plan in the repo. It's the specification of what you'll ask for next, and it records what you decided to test and what you didn't.
5. One test at a time
Ask for a single test from the plan, using the roles it saw, and run it three times.
Ask for a single test from the plan, stating that it must use the roles and names it saw on the page. Run it three times in a row before asking for the next one. Generating one at a time looks slow, but each passing test confirms the conventions were understood, and each failure gets fixed once instead of twenty times. When a test fails, first check whether the problem is the test or the application. If the agent explored and the test still fails, it may have found a real defect.
6. Safety limits
Set limits: never production or real credentials, and remember the agent reads all page content, including malicious text.
Two fixed rules. First: never production or real credentials. The agent can click anything it sees, including delete and pay buttons. Second: all page text enters its context, and that includes content written by third parties, such as comments, user names or product descriptions. If someone wrote an instruction there, the agent may try to follow it. Use a test environment with controlled data and review any action you didn't ask for.
Illustrative example
A tester connects the server and asks the agent to explore a to-do list application. The report lists a text field, a checkbox per task, three filters and a counter. It flags two suspicions: the counter says "1 items left" with a single task, and there is no visible way to edit a task. The first is a minor copy defect; the second isn't a defect, you edit by double-clicking and the agent didn't discover it. She corrects the plan by adding the edit case, asks for the first test, "add a task", and it passes three times. In twenty minutes she has a reviewed plan and a trustworthy test.
Common mistakes
- Asking for tests before exploring and having a reviewed plan.
- Not confirming that the browser tools are loaded.
- Treating the exploration report as a list of confirmed bugs.
- Pointing the agent at an environment with real data or credentials.
Checklist: how to know it is done
- The browser tools show up in the agent's list.
- There is an exploration report with roles, states and suspicions.
- The Markdown plan is corrected and saved in the repo.
- One generated test passed three runs in a row.
Where AI fell short
It confuses expected behavior with defects when it doesn't know the product rules. The exploration report is a list of suspicions, not bugs.
Frequently asked questions
Does this replace exploratory testing?
No. The agent walks through what's visible and describes what it finds, but it lacks your intuition about where the product tends to break and doesn't know the rules. It works as a first pass that leaves you a map, so your exploratory session starts at the interesting part.
Does it work with applications that require login?
Yes, with a test user. The tidiest way is to have the session already started through a saved state or a setup step, without pasting the password into the chat. Credentials should never end up written in the conversation or in the plan.
Why not use screenshots?
You can, but it costs more tokens and yields worse locators, because an image doesn't say which role an element has. The accessibility snapshot is structured text, cheaper and directly usable for writing role-based locators.
Day 10 of 31 of the 31 days of QA + AI series. Commands and versions reviewed in November 2026: rerun them before relying on them, AI tooling changes fast.
← Previous: Agent harness for QA: rules, skills and MCP in your automation repo
Next: Playwright Test Agents: planner, generator and healer in action →